Friday, 8 April 2011

Just for Fun - Circles


This is my entry for this weeks Just for Fun which is circles.

I adore this paper , Ive had it a while and I keep cutting bits off it for projects and its getting smaller and smaller, not much left now, but the colours are gorgeous.

I added it to my blank card then added some plain cream circles which I cut with my cuttlebug , added the fab little umbrella man ( hes another favourite) and a quote instead of a 'Happy Birthday' this way it can be used as a card for a few things instead of just being for a birthday.

Thanks for stopping by my blog and I hope you have a lovely weekend.

Monday, 4 April 2011

Just for Fun - Anything goes


Sorry Im a bit late with this one, where does the time go to?

This is for this weeks Just for Fun which is anything goes.
Ive had these photos of myself as a baby to work with for ages , and not really known what the best thing to do with them was. Ive used a few on pages and atcs as they are tiny .
They were actually produced as proofs from a photo shoot when i was a baby from which my parents were supposed to choose an enlargement.
Its funny looking at all the facial expressions as obviously someone was trying to keep me entertained for the photographer.

It was my intention to do something with them for the challenge a couple of weeks ago as they are the size of inchies, however i couldnt quite get my head around how to display them on the page.

They have been lying on my table just getting spread all over and have ended up on the floor more times than i care to say.

As I was looking in one of the paper drawers the other day for the right shade of 12 x 12 for something totally different I came across this 12 x 12 which has coloured squares all over it, just a bit bigger than an inchie.

Its a Steffi Paper called Tutti Frutti. I instantly thought of all these little prints when i saw it. I was talking to my Mum yesterday about the pictures but that I couldnt decide which amazing shape I should make, without realising what i was doing I made a 'J' the more I looked at it the more I liked it and so its stayed.

Theres been no skill involved in making the page it literally fell together by accident. However its taken care of what to do with all these little images thats for sure.

Thanks for stopping by my blog its much appriciated.

Sunday, 3 April 2011

Scrapbook Garden - Tando Banners


Im seeing these fab banners everywhere, and thought they would be brilliant for birthday cards for my grandchildren.
They both have birthdays coming up so for once Im prepared early with my cards.


I started first by making these delicious calorie free cakes, I love these and use them alot for cards and scrapbook pages.


I added some paint to one of the banners using a purple Adirondack dabber.


I added some ribbon just to finish off the edge.


The other banner I covered with patturned paper which was easy to do and gave another different look. I added some tiny hearts to the girls card and some little cars to the boys one.


I then put everything together , various die cuts and the childrens names to personalise them. They were quick easy cards to make and the banners helped give that real birthday party feel i thought.


I also like to add a couple of little die cuts to the inside of cards to carry on the theme.


The Tando banners can be bought from the Scrapbook Garden who stock a range of Tando shapes pop over and have a peep.

Thanks for visiting my blog and have a nice Mothers Day

Friday, 1 April 2011

Scrapbook Garden - Prima paper and Tando Houses


This is my first page for the Scrapbook Garden as one of the Design Team Members.

The items I was given to work with were fab. Ive really enjoyed making this layout.
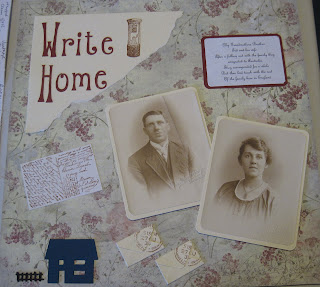
Ive chosen to do a vintage layout , for anyone who doesnt visit my blog regular I have a huge collection of vintage family photos and Im putting together a set of scrapbooks detailing my family history.


The pictures I decided to work with are of my Grandmothers brother Ted Hughes and his wife. After a family disagreement they emigrated to Australia and after a short while the family here lost touch with them which is a shame.


I started by painting one of these fab little Tando houses with an Adirondack paint dabber in Stream. It covered the chipboard with one coat which was perfect , I used the Pitch Black one for the little fence. (As Ted and his wife moved home this seemed appropriate)


I then took some 12 x 12 cardstock in Whipped Cream, its a lovely soft cream and I found it perfect for this layout. I added my title using the Bourdeaux cardstock which was a great contrast to the whipped cream. I chose the title 'Write Home' because maybe if they had kept in touch a bit more we would know what happened to the family. I added a little post box which serves for the writing home theme but also because my family owned the local Post Office so post has featured heavily throughout my life.


I stamped a scripted postcard , made some little envelopes and added date stamps to once again keep the postal theme.


The 12 x 12 paper I used was a Prima paper from the Botanical collection 'Far Far Away'. It was hard to chose which side to use as I loved them both but I settled for this side. These papers are a lovely quality and really nice to work with.


Then I was ready to attach everything together.


And they you have it. Im over the moon with my page.
Thanks for stopping by my blog and I hope you have a nice weekend, and remember all of the products I used can be bought at the Scrapbook Garden and you could pop over to their blog and see what thats all about too, you can find their blog here

Sunday, 27 March 2011

Just for Fun - Different use for a Rubber Stamp


Apologies I was missing last week, Ive tried to get caught up but failed im afraid.

This is what I have made for this weeks challenge at Just for Fun which was to do something different with a rubber stamp.

Ive bought so much crafting items that havent been used very much and my Melt pot is one of them. I had some left over melted utee which was a mixture of a few colours which meant it had shades and streaks running through it. This made it perfect for this project.
I have some lovely peacock stamps which always look nice , and one in particular is the one I have chosen for this project , its set in its own square making an ideal size for an embellishment.

I was pleased with the way the stamp and the colours in the utee went together.

I added some jade green velum to the front of my card to match it in with the shades in the feather. Added some tartan adhesive ribbon which put me in mind of these big country houses where peacocks roam free in the grounds.
I attached the feather and the stamped utee embellishment to the front of the card and then added a stamped image of the same rubber stamp to the inside of the card .

I was pleased with the finished result and will definately make more utee embellishments using rubber stamps.

Thanks for stopping by my blog, enjoy the rest of the weekend , Im off to work now.

Saturday, 12 March 2011

Just for Fun - Bandana technique


This is for the Just for Fun challenge, and its the Bandana technique.
Havent tried this before , but all the same dont think ive done it correctly lol.
If its not a scrapbooking page these days im finding it very hard to get inspired.

At first i thought i would incorporate my piece within a scrapbook page, but that didnt work.
So it became a little hanging, and then 30 mins later ended up a card topper.......

I enjoyed making it , I guess I was out of my comfort zone and need more practice.

Have a fab weekend and thanks for stopping by my blog.

Sunday, 6 March 2011

Just for Fun - Mixed Media


This is my entry for this weeks Just for Fun challenge which is Mixed Media.

I used a little divider box and covered it with handmade paper for the texture.
Next painted it with acrylic paint, then cut 2 panels of patturned paper to fit into the cavities.
I then added to them some rubber stamps , a photo of my dad when he was at school and some petals from a hydrangea plant which i had dried.
I attached the whole thing with foam pads to give it a better effect.

It is nothing like how i intended it to be at all , dont know what happened to my idea.


Sorry its a bit late, weekends are always busy in my house.

Thanks for stopping by my blog and I hope you all enjoy the rest of your weekend.

This is brilliant , i love it !